Hello loves <3


It's been quite awhile since my last treat/food post! And this past weekend I went to Chummy's and we ended up making these absolutely adorable easter/spring-themed treats! So in today's post, in light of the spring beginning and Easter being right around the corner, here is a post on how to make DIY egg nest cookies!
Ingredients:
- Sugar cookies (we bought them, but feel free to bake your own!)
- Shredded wheat
- Icing (we used Vanilla)
- Food coloring (if you're buying colored icing, you don't need this)
- Chocolate Chips
- Mini chocolate eggs (we used Cadbury's Mini Eggs)
Step 1: Poor your chocolate chips into a bowl and melt them using either the microwave or placing the bowl on a pot filled with water about an inch high (acts as a double-boiler). If using the stove method, like we did, place your pot on the stove and turn it on medium heat, adjusting the temperature as you go.
You'll notice that the chocolate starts to melt when the water begins to boil/bubble. Stir the chocolate/scrape the side of the bowl so the chocolate does't burn and take the pot off the heat as soon as everything's done melting.
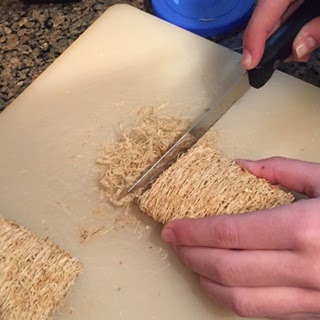
Step 2: While the chocolate is melting, as it does take more time the bigger amount of chocolate you use, begin cutting up your shredded wheat.
You can use anything else you'd like for the nest, like Mini Wheats cereal or I've even seen it done with certain types of dried noodles, but we found that cut up shredded wheat resembles branches that make up a nest very well!
We used about one and a half shredded wheat...rectangles we'll call them, to make 8 cookies. And the box we bought had four packs of I think it was 4 or 6 "rectangles," so we had more than enough.
*BEWARE: SHREDDED WHEAT GOES EVERYWHERE. AND I MEAN EVERYWHERE.*
Step 3: The chocolate should be close to done melting when you're done cutting up the wheat (don't forget to continuously check on it and stir/scrape when needed!). Poor the wheat into a bowl and poor in the chocolate on top. Use a spoon to completely coat all of the wheat pieces with the chocolate. Try to resist the urge to eat it! And make sure to pour the chocolate in as soon as possible, because chocolate sets fast!
 |
| it may look unappealing in this picture, but trust me it's delicious :)x |
Step 4: Time for frosting! We used store bought frosting, but just like the cookies feel free to make your own, and spoon it into four separate bowls.
Then squeeze one drop of one of your food coloring dyes into each bowl. One drop will get you these gorgeous pastels, which really remind me of spring! But if you'd like more vibrant colors, don't hesitate to squeeze more.
Stir in the dyes until you get an opacity you're happy with.
Step 5: Take one of your cookies and using whatever utensil you have handy, spread the frosting in order to coat it.
Step 6: Spoon some of your nest (chocolate/shredded wheat) mixture, about a tablespoon (maybe more, maybe less, your preference) onto the center of your cookie.
Use your fingers, or a spoon, to spread around and shape the nest, patting it down flat towards the middle where the eggs will go.
Step 7: Probably one of my favorite steps, place your eggs in your nest! Arrange them in what ever order and quantity you like!
Ta-da!! There you have your super sweet DIY Easter egg&nest cookies! These are absolutely delicious. They look absolutely adorable displayed in your kitchen and would be a gorgeous gift for family and friends!
If any of you decide to make these amazing treats, please let me know! Whether that's by Twitter, Instagram (both @HarelZiv_), emailing me pictures (harelrziv@gmail.com), or leaving a comment (possibly with a link to your blog if you posted pictures) please do!
Chummy also posted about this yummy treat! Check out her blog here.
Chummy also posted about this yummy treat! Check out her blog here.
Thank you for reading and I'll talk to you soon.
*computer hug*


I had so much fun making these with you Chums! So true about the shredded wheat going everywhere! haha xx
ReplyDeletelove you, Chummy!
DeleteI am so making them, they look amazing!!!
ReplyDeletePeace xo
omg that's awesome! thanks for reading :))
DeleteThese look so delicious I really want to make them. I love the colour of them they look so cute xxx
ReplyDeletehttp://izzyk1998.blogspot.co.uk/
I hope you try them! Thanks, girl <3 xx
Deletelooks so yummy
ReplyDeletecheck out my newest post
xx
Tyana
theluxedition.blogspot.com
they were :)) and will do <3
DeleteThese look so yummy! Will definitely need to try making them soon!
ReplyDeleteCarolyn x
Carolyn’s Simple Life
yay! glad to hear it! :)X
Delete